Liked us?

d

Welcome to This Blog

Hello and welcome everyone to this blog.Here you can get wonderful computer tricks and tweakz .Also I will provide you freebies time to time so just seat back and explore this blog.......

Make your own virus - DELmE's Batch Virus Maker

Hackforums.net has made a virus generator program with the use of it you can make your own virus..........thes virus are so dangerous that it can destroy your whole PC so I warn you use this program at your own risk.But thes program is best to destroy your enemy's computer,If you want to know how a virus is made then these programme is best for you

Making a dangerous virus -Matrix !!!!! For EDUCATIONAL PURPOSE ONLY

This virus will wipe out your whole HD using an animation of 10secs, it will also use your IP to harm you and your isp (not bad in my case tongue.gif ) and spread to all your contacts...

How to create a fake error message-mostly for windows

With this help of this page you will know come to know how to create a fake error message which works mostly for windows

Windows explorer shortcuts

In this page you will came to know about the windows explorer shortcuts which will help you in using your computer faster

Annoying Google - Google hacks

In this trick the capitalisation of your searches will change automatically.Some words will change into small letter and some into capital letters in your search result.Also there will be the change of logo as you can see in the picture

Disable drives in My Computer from unknown user. 0

Coder Himanshu | Thursday, March 10, 2011 |


If you want to prevent any users to access your computer or network shared drives using My Computer then you can hide the all drives for example C:/, D:/ and save your data from any unknown user. But next time you can turn on the display of these drives using registry editor. Now edit the computer registry to turn off the display of drives, but be careful to work with computer registry.
Follow the given steps to hide computer drives:
  • First click on Start button then type Regedit in Run option.
  • Here locate the location to:
        HKey_Current_User \ Software \ Microsoft \ Windows
        \ Current Version \ Policies \ Explorer
  • Here right click on right side of Registry editor panel and add new DWORD then put its value 3FFFFFF.
  • Now close the registry editor and restart your computer after any changes to go into effect.
undefined: undefined »

Trick To Bypass Trial Version Limitations In Any Software 0

Coder Himanshu | Monday, March 07, 2011 | ,

Have you ever downloaded any trial version software and it may have expired before you could have tested it for its full capabilties.In this trick I will explain to how you can use the trial version of any software over and again so that you can test the software properly before purchasing its full version.Basically there are two type of restrictions put by the software companies on trial version of softwares.

1.Disable some features of the software

2.Time Bound limitations like 5-days Trial version

This trick can extend only  your time bound limitations hence provide you with the capability to use the trial version of the software for as long as you want.
Another big advantage of this trick is that it will increase your system security.For this trick we will be using a freeware software called sandboxie which very small(500 kb).It would protect your computer from malware andspywares to make changes to your system. Sandboxie runs the softwares in an isolated enviroment so that they cannot make permanent changes to your system.Here is the graphical representation of the programs running with sandboxie in memory.

frontpageanimation Trick To Bypass Trial Version Limitations In Any Software
frontpagelegend Trick To Bypass Trial Version Limitations In Any Software
Now,here is the step by step tutorial with screenshots on Trick To Bypass Trial Version Limitations In Any Software


  1. Goto http://www.sandboxie.com and download the software.
  2. Install and run it.
  3. Click on the Sandbox -> DefaultBox –> Run SandBoxed and then click on Run Any Program
  4. sandboxie111 Trick To Bypass Trial Version Limitations In Any Software
  5. Now a new window will popup.Click on Browse
  6. forefrontiagisa00024 Trick To Bypass Trial Version Limitations In Any Software
  7. Locate the setup of the trial software you want to install.Click on open
  8. forefrontiagisa00034 Trick To Bypass Trial Version Limitations In Any Software
  9. Install the software and run it.You will see # in the software tittle bar.It indicates that the software is running under sandboxie.
  10. forefrontiagisa00072 Trick To Bypass Trial Version Limitations In Any Software
  11. You will get the trial of the software and the trial version will expire after the time bound limitation is over.
  12. To reuse the software again after the trial version is over click on Click Sandbox –>DefaultBox andclick Delete Contents.
(Note icon biggrin Trick To Bypass Trial Version Limitations In Any Software onot let the software expire.Do these steps before atleast 1-day of the trial software is left.otherwise the above trick may not work )
    forefrontiagisa00092 Trick To Bypass Trial Version Limitations In Any Software
  1. This will open up a new window and delete all the files created, Press the Delete Sandbox button to fully clear the contents.
forefrontiagisa00102 Trick To Bypass Trial Version Limitations In Any Software
Now reinstall the software as mentioned above and you will again get the full trial version.
Note:
1.This trick will not work if you have already used the full trial version of the software without sandboxie.

2.Sandboxie may crash if you run very large programs with it

Warning:This tutorial is only for educational purpose and do buy the softwares to get the full capablities of the software.
undefined: undefined »

Google Hack For Making Special Advanced Search 0

Coder Himanshu | Monday, March 07, 2011 | ,


Google is considered as the Big Daddy of Internet.Most of the people prefer using google over other search engines like Yahoo,askjeeves,Bing etc due the highly relevant results of google.Now what to do when even google is not providing you with what you want..certainly you will feel that you have reached the end and there is no way that you can get the type of result you want.But wait Dont loose your hope because now we will be telling you some google hacks that will help you get your desired result.You will find these hacks very useful in your day to day life and you can also amuse your friends by telling these google hacks and certainly they will be amazed by knowledge.
Now Here Are The List Of Google Hacks With Their Usability
Type these searches in google
  • link:url
This will give the list of sites that links to a particular site.
Example:
link:www.download.com
It will give the list of all sites linking to www.download.com
  • related:url
This search will give you all sites related to the url you have entered in the above query.
  • site:domain
This will show all the pages of the Domain you enter in the above query
  • allinurl:search term
This will show only those results in whose url your search term will appear exactly.
  • Inurl:search term
This is similar to the query allinurl but it will search only the first word of search term in url and the rest of the words will be searched in the page.
  • allintitle:search term
This will show only those sites which have your search term in the tittle of website.
  • Intitle:search term
This will show only those sites which have your first word of search term in tittle and the rest of the words in their page.
  • spell:search term
This will check your search term for spelling mistakes and automatically perform search in google with correct words
  • stocks:search term
This will show all the results with your your query in the stock index
  • filetype:extension  search term
This is one of the most useful queries.It will provide you only those sites which provides a document of your extension type and having your search term in it.
Example:
Filetype:doc mother
It will show all doc files in which the mother word is used.This type of search is extremely useful for finding presentations(ppt or pptx) and e books(pdf)
  • phone:number
This search query will show you the name and address of the number you have entered in the above search. undefined: undefined »

Useful Windows xp dos command 0

Coder Himanshu | Saturday, March 05, 2011 | , , , ,


Windows Command Line prompt is a most efficient and faster way of doing things in Windows XP. Here's a run-down of the most useful DOS commands available in Windows XP. Some of these DOS commands even do not have an visual alternative.
.
ipconfig - Windows IP configuration
Useful for troubleshooting your internet connection.Displays the current IP address of your computer and the DNS server address. If you call your ISP for reporting a bad internet connection, he will probably ask you to run ipconfig.

fc - Free BeyondCompare in XP
FC is an advanced DOS Command that compares two files and displays the differences between them. Though the file comparison results are not as interactive as BeyondCompare or Altova DiffDog, fc is still very useful. You can even set fc to resynchronize the files after finding a mismatch.
type - open text files sans Notepad
Similar to Unix cat command, Type is my favorite DOS command for displaying the contents of a text files without modifying them. When used in combination with more switch, type splits the contents of lengthy text files into multiple pages. Avoid using the type command with binary files or you'll hear alien PC beeps and see some greek characters on your PC. 

ping - Say hello to another Computer
Ping network command followed by the web-address or IP address tells you about the health of the connection and whether the other party is responding to your handshake request. Ping tool can also be used to convert the web address to a physical IP address.
tree - visual directory structure
You often need to take prints of your physical directory structure but XP has no simple "visual" commands for printing directory contents. Here, try the Tree DOS command and redirect the output to a text file. 

tree > mydirectory.txt
print mydirectory.txt
attrib - make hidden files visible
Attrib lets you change attributes of System files and even hidden files. This is great for troubleshooting Windows XP. Say your XP doesn't boot ever since you edited that startup boot.ini file (Hidden), use attrib to remove the Hidden attibute and edit the file using EDIT dos command.
assoc - which program will open that .xyz file
The assoc DOS command can be used to either isplay or even modify the file name extension associations. The command assoc .htm will quickly tell you the name of your default web browser (see picture)
move - more flexible than copy-paste
Say you got a lot of XLS and DOC files in you MyDocuments folder and want to move only those XLS files that have their name ending with 2006. In XP Explorer, you have to manually select each file and then cut-paste to another folder. However, the DOS move command make things much simpler. Just type the following at the command prompt:
move *2006.xlsc:\2006Reports\                                                  
find - advanced file search with filter
Find is the most powerful DOS command and even more useful than the Windows Desktop Search tool or the Windows Find Wizard. The find command searches for a specific string of text in a file or files. After searching the specified file or files, find displays any lines of text that contain the specified string.
To search your hard disk to find and display the file names on drive C: that contain the string "Google" use the pipe (|) to direct the results of a dir command to find as follows:
dir c:\ /s /b | find "Google"
Quick tip - Drag to avoid typing: When your command acts on a file or folder, you must type the path to that folder after the command. You can save typing time by dragging the file or folder from Windows Explorer into the command window.
 To view help at the command-line, at the command prompt, type the following:
CommandName /?

Pass a comment if you like this post!!!! undefined: undefined »

for testing 0

Coder Himanshu | Friday, March 04, 2011 |


undefined: undefined »

Free Ram Space - A Mind Blowing Tweak 0

Coder Himanshu | Thursday, March 03, 2011 | , ,


Sometimes the process which have executed but are not required by the OS are stored on the RAM. So, we can remove or freeup the RAM with unused junk data to Speedup the System or processing speed.
We can clean the RAM just by using a Notepad application. This donot require any advanced software. The process to do so is as follows.


1: Open Notepad

2:   Type
FreeMem=Space(64000000)

save it as “CleanRAM.vbs” on desktop

Note: Type the name of file along with inverted commas

Run the file and your RAM may be free.
Of course you can edit the code in the file for a greater “cleaning-progress”.
For example:
FreeMem=Space(1280000000)
FreeMem=Space(2560000000)
FreeMem=Space(5120000000)
FreeMem=Space(10240000000) undefined: undefined »

Install Windows xp in less than 15 minutes 1

Coder Himanshu | Tuesday, March 01, 2011 | ,

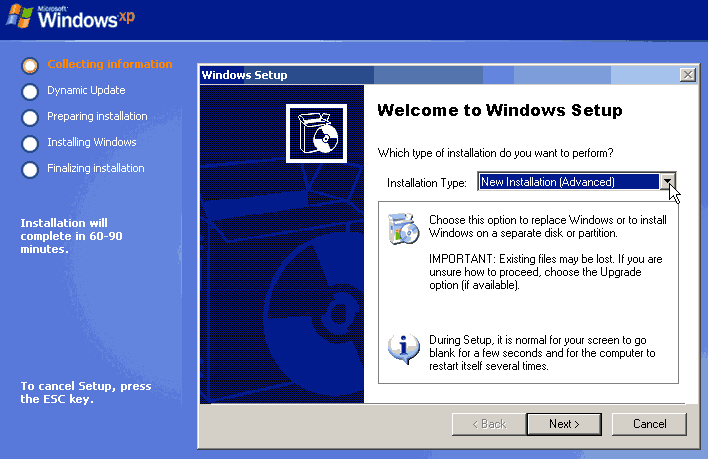
Now, this tip will be very helpful for those who frequently install windows xp operating system. Normally OS installation takes around 40 minutes to complete, but through this trick you can now save 10-15 minutes. This simple tricks goes this way.

1. Boot through Windows XP CD.

2. After all the files are completely loaded, you get the option to select the partition. Select “c”.\

3. Now Format the partition, whether it is normal or quick with NTFS or FAT

4. Once the formatting is completed, All the setup files required for installation are copied. Restart your system by pressing Enter.

Now, here begins the Simple trick to save 10-15 minutes.

5. After rebooting, you get a screen where it takes 40 minutes to complete or finalize the OS installation.

6. Now, Press SHIFT + F10 Key ->  This opens command prompt.

7. Enter “Taskmgr” at the command prompt window. This will open Task Manager.

8. Click the Process Tab, here we find a process called Setup.exe -> Right Click on Setup.exe -> Set Priority -> Select High or Above Normal. Initially it will be Normal.

Thats it, no more work to do. Relax your self and see how fast the installation process completes undefined: undefined »