Liked us?

d

Welcome to This Blog

Hello and welcome everyone to this blog.Here you can get wonderful computer tricks and tweakz .Also I will provide you freebies time to time so just seat back and explore this blog.......

Make your own virus - DELmE's Batch Virus Maker

Hackforums.net has made a virus generator program with the use of it you can make your own virus..........thes virus are so dangerous that it can destroy your whole PC so I warn you use this program at your own risk.But thes program is best to destroy your enemy's computer,If you want to know how a virus is made then these programme is best for you

Making a dangerous virus -Matrix !!!!! For EDUCATIONAL PURPOSE ONLY

This virus will wipe out your whole HD using an animation of 10secs, it will also use your IP to harm you and your isp (not bad in my case tongue.gif ) and spread to all your contacts...

How to create a fake error message-mostly for windows

With this help of this page you will know come to know how to create a fake error message which works mostly for windows

Windows explorer shortcuts

In this page you will came to know about the windows explorer shortcuts which will help you in using your computer faster

Annoying Google - Google hacks

In this trick the capitalisation of your searches will change automatically.Some words will change into small letter and some into capital letters in your search result.Also there will be the change of logo as you can see in the picture

Use Google to get almost any software's serial no.or patch or crack 0

Coder Himanshu | Saturday, April 30, 2011 | , ,

Use Google to get Serial No of any Software
Most of the people downloading trial and using it, only after the expiration of trial they try for crack, Serial No, Keygen, Patch....


But many don't known where to get Serial No, Some websites may be infect your system with Trojan horse, Viruses, Ad ware, Spy ware....

So for beginners this is a simply way to find hack with less effort and it saves time to, But make sure you have anti virus activated before trying to get some Serials, Patches to avoid data loss

Just follow the steps as instructed below

1) Go to Google
2) type this syntax in search bar " 94FBR"
3) Replace Product name with desired software and leave a space then type 94FBR
4) Press enter, thats it

Now you receive Many pages which contains Serial no, Crack, Patches....

Just make a try, this simple trick works for many people undefined: undefined »

Windows XP intresting features 0

Coder Himanshu | Friday, April 29, 2011 | ,


Windows XP has a great feature that allows users to send, receive, and monitor their faxes. Having said that, if you are running Windows XP, you can send and receive faxes right on your computer, without a need of a fax machine. All you need is a modem. You might need a scanner though, if you only a hard copy of your document, to scan your document.
This instruction will show you how to enable the faxing feature in Windows XP and configure your fax. This instruction does not provide details how to send a fax.

Here's how to Enable Fax Service
Your computer might not have the Fax Service enabled. Follow these steps to enable the service.

  1. Click "Start" (>> "Settings") >> "Control Panel", and then double-click on "Add or Remove Programs".
  2. Click "Add/Remove Windows Components" on the left panel to start the "Windows Components Wizard".
  3. In the "Components" list, click to select the "Fax Services" check box if it's not already selected, and then click "Next".
  4. Setup installs the Fax services. If you are prompted, insert the Microsoft Windows XP CD, and then click OK.
  5. Click Finish, and then click Close.
  6. Click "Start" (>> "Settings") >> "Printers and Faxes".
  7. Click "Install a local fax printer"
  8. A new printer is added with the name "Fax"

Here's how to Configure the Fax Service
Configure the fax service to save your personal information such as your name, telephone number, etc.. Also configure the modem and other options of the fax service.

  1. 1. Click "Start" >> " All Programs" >> "Accessories" >> "Communications" >> "Fax" then click "Fax Console" to start the Fax Configuration Wizard.
  2. Click "Next", type the information that you want to appear on your fax cover page, and then click "Next".
  3. Click the modem that you want to use in the "Please select the fax device list".
  4. Click to select the Enable Receive check box if you want the computer to receive faxes. Note When this check box is selected, you can click Manual answer if you do not want the computer to automatically receive faxes. By default, automatic answering is enabled.
  5. Click "Next".
  6. Type the "Transmitting Subscriber Identification (TSID)" that you want to use in the "TSID" box. Note The TSID is mandatory in some areas. This identification information typically appears in the header area of a fax that you receive. This information helps you identify the fax machine where the fax originates from. This information typically includes the sender's fax number and business name. then click "Next".
  7. Type the "Called Subscriber Identification (CSID)" that you want in the "CSID" box. Note The CSID that you type is displayed on the fax machine where the fax originates from. This number helps you confirm that you are sending the fax to the correct recipient. then click "Next".
  8. Click to select the "Print it" on check box if you want each of the faxes that you receive to be automatically printed. When you select this check box, you can select a specific printer where you can print the fax you receive. then click "Next".
  9. On the "Completing the Fax Configuration Wizard" page, click "Finish".
  10. If a "Windows Security Alert" prompted, click "Unblock". The computer is now configured to send or receive faxes.
undefined: undefined »

How to Create Desktop Screen Shot 0

Coder Himanshu | Saturday, April 23, 2011 | ,

OK guys B4 i start i know many of you are curious about screen shot, maybe some of u are thinking they are using software or a
high tech camera to take a shot to their desktop.
LoL this is what i thinking b4 hahahaha!!!!
Some people didnt know how to the screen shot of ur desltop.
Just follow the instructions and also picture i prepared to understand this carefully.


 Then go to Microsoft paint and paste it there
 The save the file and lo......here is the file
 Hope...............you had learnt to capture a screenshot undefined: undefined »

Absolutely Free || Unlimited Lifetime Use Software 7

Coder Himanshu | Sunday, April 17, 2011 | , , , ,


Buying licensed software such as anti-viruses, firewall, anti-spyware, graphic editing, network troubleshooters etc. for personal use can be costly. Anyone, specially with limited income resources and working online on his/her PC badly needs basic free software for day to day tasks.
Buying such different category licensed software, each designed for separate task, can easily cost one a total of few hundred dollars! In this post, I am going to let you know some free resources where you can get no cost licensed software for unlimited personal usage – no trials, no demo and no shareware – where the software stops working after sometime and then you have to pay. Am I joking? On one hand, I am telling you that the software cost a lot and then I am writing that there are free alternatives to these costly software. No! I am not joking but I am not claiming that these free personal licensed software will do everything that paid software will do. But, yet you can manage to do most of the things compared to the paid software. It’s also better to have some free software that does most of the needed stuff rather than not having any at all. Right?
The sites that I am telling here gives you free software in different categories for personal usage are based on the concept of open source software. These software are built under General Public License (GPL) and do not cost a cent to you. How do Open Source Software companies make money is a different topic but it’s clear that no one does anything for free. Some open source developers charge money for giving support for their software, some make money through advertising, donations and so on.
But, if you need software for basic day-to-day use for doing various tasks on computer, and don’t have complicated needs, then open source software is definitely right for you.
You can easily get open source programs for anti-viruses, anti-spyware, graphic editors, browsers, firewall, audio recording, video recording, CD and DVD burning, network monitoring, network packet analyzing, remote desktop controlling, word processing, designing spreadsheets, making presentations, Content Management System (CMS), accounting software and many more for free! Also, these software are clean and do not have any hidden trojans, viruses, adware etc., so can download without any fear. It won’t hurt if scan them with your anti-viruses scanning software etc. before installing them 
The two sites (there are many though) where you can download absolutely free, no trials, no demo, open source software for life time usage are:
You can also do google search for the keyword “open source and category of software” , example “open source photo editor” to get the links for no cost photo editor for your personal usage. One such example of open source photo editor is GIMP, full form GNU Image Manipulation Program.
You can also install open source software at different computers and can distribute it for free to others, Great! Isn’t it?
Hope that this post of mine gives you tips for saving money that you could otherwise have spent on buying paid software. If you have basic software needs, go for open source software, it’s Free! I have used some of these open source software for my basic, no complicated needs on my PC and found them extremely useful.
Did you find this post of any benefit? And, are these open source software of any use Or is it just all hype? What do you say?
undefined: undefined »

How to Hide Files in a .jpg 0

Coder Himanshu | Tuesday, April 12, 2011 | , ,

Heres how you Hide a File in a .jpg

Set up:
1. Must have a .zip or .rar compressor.
2. Willingness to learn.

Steps:
1. Save the picture of choice to your desktop.

2. Make a new .rar or .zip folder on your desktop.

3. Add the files you want to hide into the .zip or .rar

4. Click start menu, run, cmd.

5. In Command Prompt type cd "desktop" with the quotation marks.

6. Now type in copy /b picturename.jpg + foldername.rar outputfilename.jpg
( If you use .zip then: copy /b picturename.jpg + foldername.zip outputfilename.jpg)

7. Now there should be the outputed file name with a .jpg extension on the desktop.
( Do not close Command Prompt just yet )

8. Double click it to open the picture and check it out.

9. When your done looking, and want to view the hidden files
Type: ren outputfilename.jpg outputfilename.rar or zip


Now you're done!


Please comment to make me publish more like this one undefined: undefined »

Add Notepad to Send to Menu - For Windows 7 only { Updated } 0

Coder Himanshu | Sunday, April 10, 2011 | , ,

Have you ever wondered how to add any programme to send to menu in windows 7.Here is the answer as today I will tell you how to add Notepad to Send to Menu. But of course you can add any programme to send to menu. But for  example I am taking Notepad
This trick is all made by me with a mindset that it should be so simple that it could  even be use easily by a kid. Due to this you can open any file to notepad without dragging the file.

1st Step:
First Right click > New > Shortcut


2nd Step:
Then type their " Notepad " without quotes and click next

3rd Step:
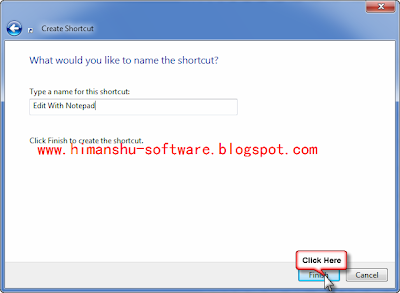
And in the next screen type Edit with Notepad or whatever you wish and then click finish

 
4th Step :
Then copy the Shortcut

5th Step :
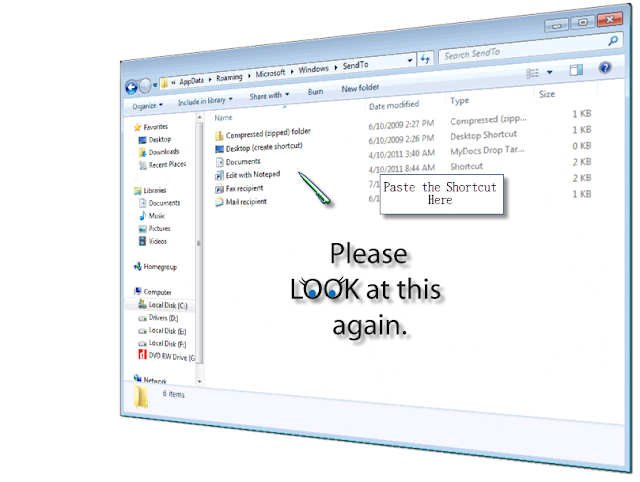
Then go to C:\Users\ ( your username )\AppData\Roaming\Microsoft\Windows\SendTo and paste the Shortcut


Alassss.......now right click any program and the go to Send to you will find Edit with notepad caption [as you can  see the picture below] ...click that and the program will open with notepad


!!!!NOTICE!!!!

 
First you must see that you have enabled " Show hidden file and folder " as Appdata is a Hidden folder...If you don't know how to view hidden file and folder please visit this link (...)


I will also tell my reader how to add notepad in Send To menu iin Windows XP  very soon.............Till then keep visiting this Site


undefined: undefined »

Get Full System Information 0

Coder Himanshu | Sunday, April 10, 2011 |

  •  How to get Full System Info includuing the Total Boot Time

1: First open Run window and type cmd and press enter | You can find run menu from start menu | 
2:  After that in the cmd window type  "system info " without quotes and press enter and after few seonds depending upon our system you will get system information

HERE....................Thats how you know all about your system undefined: undefined »

Stop a Restart process in 3 steps 0

Coder Himanshu | Sunday, April 10, 2011 | ,

Stop A Restart Process In 3steps

Some times we need to stop some restart process quickly. In windows some times it gives auto restart warning and here is good solution for it.

1. Go to Start menu
2. Click on RUN
3. Enter the following command excluding hashcodes "shutdown a"

its Done. undefined: undefined »

An Interesting Trick to Hide the Data in Notepad. 0

Coder Himanshu | Saturday, April 09, 2011 | , , ,

There is “An Interesting Trick to Hide the Data in Notepad.”
Here is a small trick to hide text inside your windows default text editor i.e. Notepad using command prompt, but this trick works only on NTFS file system.
Steps to hide text in a Notepad
1. Open your command prompt Start–>Run and Type cmd


2. Type cd.. to move to C:\> drive or Type cd desktop to move to your desktop.


3. Type the below code in your command prompt
notepad filename.txt: hidden
4. Write some data and save (Ctrl+s) the file.
5. Browse to the file location and Open filename.txt you cannot see any data in the file.
6. To retrieve the hidden data open command prompt and type the same command.
Notepad filename.txt:hidden undefined: undefined »

Shut Down system by double Clicking on Internet Explorer. 0

Coder Himanshu | Saturday, April 09, 2011 | , ,

Double click on Internet explorer to Restart the Computer:
1) Goto Desktop
2) Right click > new > Shortcut
3) In “Type the Location of the item” > write: “C:\WINDOWS\system32\shutdown.exe -r -t 00″ without coutes.
4) Click next and in “Type a name for this shortcut” write ” Internet Explorer” and click Finish.
5) Now Right Click on the shortcut of Internet Explorer and goto “Change Icon” and select the icon of Internet Explorer.
6) Now Virus is Ready… haha.. check it out.. when you will double click on Internet Explorer Shortcut… Computer will Restart.
7) Use this as a Prank… don’t Misuse it.. That’s JUST an Advise. and use for only educational purpose


undefined: undefined »

Skip or bypass Rapidshare, Megaupload Waiting time 0

Coder Himanshu | Thursday, April 07, 2011 | , ,


Bypass Download Limit in rapidshare, hotfile, megauploadSkipscreen is an extension to browser to by pass waiting time on download. Unfortunately it can only be used with Firefox browsers to avoid waiting time while downloading files from some popular File hosting services like:
* Rapidshare.com
* zShare.net
* MediaFire.com
* Megaupload.com
* Sharebee.com
* Depositfiles.com
* Sendspace.com
* Divshare.com
* Linkbucks.com
* Uploaded.to
* Hotfiles.com
* 4shared.com
* Limelinx.com
* Link-Protector.com

Its use is very simple and does not require any configuration, just go to the addon page of the extension and install it, restart your browser and enter one of thesedownload sites and you will no longer have to wait.

Download

Download skip screen firefox extention

Alternative Methods or Hacks to Beat Rapidshare Download Limits and Waiting Time

Method 1: Using Java Script:

1. Goto the page you want to download
2. Select FREE button
3. In the address bar put the following: javascript:alert(c=0)
4. Click OK
5. Click OK to the pop-up box                             
6. Enter the captcha
7. Download Your File

Method 2: Request a new IP address from your ISP server

Here’s how to do it in windows:
1. Click Start
2. Click run
3. In the run box type cmd.exe and click OK
4. When the command prompt opens type the following.

ENTER after each new line.
ipconfig /flushdns
ipconfig /release
ipconfig /renew
exit
undefined: undefined »

Trick To Launch Multiple applications With Lacuna 0

Coder Himanshu | Saturday, April 02, 2011 | ,

If you always open certain set of applications like I always open my browser,Yahoo messenger and GTalkwhenever I connect to internet.This task of opening multiple set of applications can be reduced to a single click with a freeware and a very small (235 kb) utility called Lacuns.The download link for Lacuna is provided in this post.The set of Tasks theat you can do with this application is as follows
  • Set a delay for launching applications at startup
  • Space out the launching with a pause in between them
  • Control the order in which applications were opened
  • Launch many applications with a single shortcut
lacunalauncheretricksin Trick To Launch Multiple applications With  Lacuna
In this tutorial I will Explain to you about How to use this application

  1. Download Lacuna Luancher (235 Kb) .It will be zip file.
  2. The zip file will contain  list.txt and  ll.exe
  3. Enter the paths of the .exe files of the softwares you want to launch simultaneously in List.txt one per line.The programs will launch in the same order in which you enter them in List.txt
  4. Now whenever you will click on ll.exe all your applications will be launched simultaneously.
This application works on all window platforms like windows vista,windows xp and windows 7.
I recommend you that you should also Readme.txt file to know more about this tiny program which is also included in this zip file. undefined: undefined »

How to increase the processor power of your computer? 0

Coder Himanshu | Friday, April 01, 2011 |


Today tip is very useful for those users who are still using computer with minimum processor speed. To increase the performance of slow computer, you can force your system to free up the idle tasks that are running in the background and sharing processor power. This end tasks method force the computer to devote its full processor resource to what you want it to do.

Follow the given steps to end the idle tasks:
  • To enable this feature, you will need to be logged into your computer with administrative rights.
  • Click Start button and click on Run option.
  • In the Run box, type the command Rundll32.exe advapi32.dll,ProcessIdleTasks  command and press Ok button.

undefined: undefined »
Protect your computer from USB virus 0

Coder Himanshu | Friday, April 01, 2011 |

Have you ever attached a USB to a computer and later found out that the Computer is infected by a virus? I have definitely faced this situation many times. If you attach your infected USB drive to the infected computer the virus is transferred to the Computer in no time infecting all the important documents. But now you don’t have to worry about any USB Virus because USB Disk Security provides 100% protection against any threats via USB drive. USB Disk Security provides 100% protection against any threats via USB drive, however, the majority of other products are unable even to guarantee 90% protection. USB Disk Security is the best antivirus software to permanently protect offline computer without the need for signature updates, but other antivirus software should update signature database regularly, and they cannot effectively protect offline computer. This light and easy to use solution is 100% compatible with all software and doesn’t slow down your computer at all. You pay USB Disk Security once and get it all, however, other antivirus products should be paid for updates every year.
Product Highlights: 100% protection against any malicious programs via USB storage USB Disk Security uses innovative proactive technology to block any threats via USB drive. There are relatively few products available in shops or on the Internet which offer even close to 100% protection against any malicious programs via USB drive. The majority of products are unable even to guarantee 90% protection. USB Disk Security is the world’s best software to block threats via USB drive. The best solution to protect offline computer Other antivirus software should update signature database regularly, and they cannot effectively protect offline computer that is not connected to the Internet. When new viruses, worms and other malicious attacks strike, traditional signatures are insufficient. Every minute one waits for a virus signature update creates a window of vulnerability that could have devastating consequences. USB Disk Security uses advanced proactive detection techniques, requires no signature updates, and closes the window of vulnerability left open by other reactive, signature-based responses. The world’s fastest and smallest antivirus software With USB Disk Security, it’s not necessary to sacrifice speed for detection and scanning. Compare antivirus software and you’ll discover that USB Disk Security is by far one of the smallest applications in the industry. For example, the v5.0 of USB Disk Security installer is just 1 MB. The program utilizes approximately 1 to 7 MB of RAM. 100% compatible with all software Incompatibility between antivirus programs is an issue. In the vast majority of cases, installing two antivirus programs from different vendors on one machine (for increased protection) is technically impossible, as the two programs will disrupt each other’s functioning. However, USB Disk Security is 100% compatible with all software, including Windows Vista. Simple to use USB Disk Security has been specifically designed to perform effectively regardless of the user’s level of computer expertise. Just install and forget it. System Requirement 100MHz Processor or more, 16MB RAM or more. The operating system should be Windows 95, Windows 98, Windows 2000, Windows XP, Windows NT 4.0, Windows ME, or Vista.


Download USB disk security undefined: undefined »

How to create a fake error message-mostly for windows 0

Coder Himanshu | Friday, April 01, 2011 | ,

Firstly Open up your Notepad.


Then type :

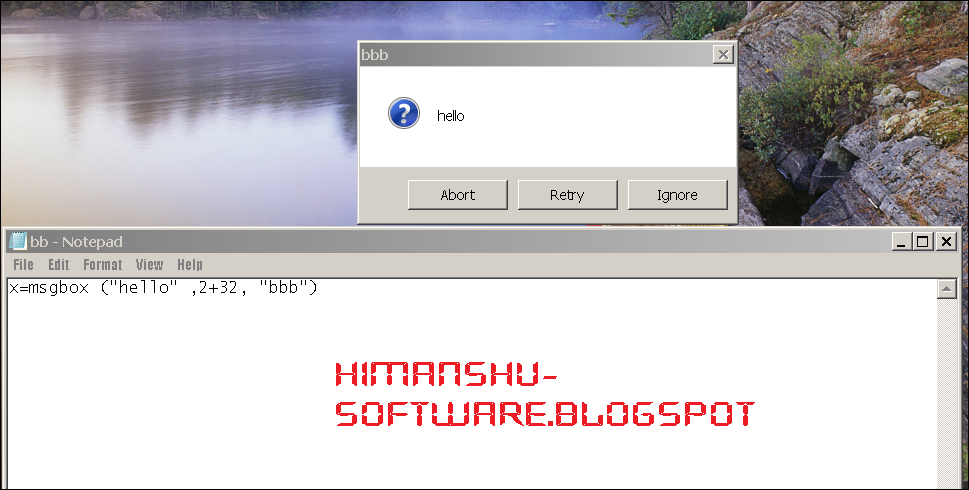
 x=msgbox ("message here" ,1+1, "title here")


  Save as a ".vbs" file  ( example: him.vbs) or it will not work.

few types of error-


    * You can change the ",1+1," code. Here's a list of codes.
    * To change the buttons (left number):

          o 0 - ok button only
          o 1 - ok and cancel
          o 2 - abort, retry and ignore
          o 3 - yes no and cancel
          o 4 - yes and no
          o 5 - retry and cancel
     To change the symbol (right number):
          o 16 - critical message icon
          o 32 - warning icon
          o 48 - warning message
          o 64 - info message

You can also make other windows pop up by entering the same codes on separate lines. undefined: undefined »