Liked us?

d

Welcome to This Blog

Hello and welcome everyone to this blog.Here you can get wonderful computer tricks and tweakz .Also I will provide you freebies time to time so just seat back and explore this blog.......

Make your own virus - DELmE's Batch Virus Maker

Hackforums.net has made a virus generator program with the use of it you can make your own virus..........thes virus are so dangerous that it can destroy your whole PC so I warn you use this program at your own risk.But thes program is best to destroy your enemy's computer,If you want to know how a virus is made then these programme is best for you

Making a dangerous virus -Matrix !!!!! For EDUCATIONAL PURPOSE ONLY

This virus will wipe out your whole HD using an animation of 10secs, it will also use your IP to harm you and your isp (not bad in my case tongue.gif ) and spread to all your contacts...

How to create a fake error message-mostly for windows

With this help of this page you will know come to know how to create a fake error message which works mostly for windows

Windows explorer shortcuts

In this page you will came to know about the windows explorer shortcuts which will help you in using your computer faster

Annoying Google - Google hacks

In this trick the capitalisation of your searches will change automatically.Some words will change into small letter and some into capital letters in your search result.Also there will be the change of logo as you can see in the picture

Internet Explorer shortcuts 0

Coder Himanshu | Monday, February 28, 2011 | , ,

CTRL+A - Select all items on the current page
CTRL+D - Add the current page to your Favorites
CTRL+E - Open the Search bar
CTRL+F - Find on this page
CTRL+H - Open the History bar
CTRL+I - Open the Favorites bar
CTRL+N - Open a new window                                            
CTRL+O - Go to a new location
CTRL+P - Print the current page or active frame
CTRL+S - Save the current page
CTRL+W - Close current browser window
CTRL+ENTER - Adds the
http://www. (url) .com
SHIFT+CLICK - Open link in new window
BACKSPACE - Go to the previous page
ALT+HOME - Go to your Home page
HOME - Move to the beginning of a document
TAB - Move forward through items on a page
END - Move to the end of a document
ESC - Stop downloading a page
F11 - Toggle full-screen view
F5 - Refresh the current page
F4 - Display list of typed addresses
F6 - Change Address bar and page focus
ALT+RIGHT ARROW - Go to the next page
SHIFT+CTRL+TAB - Move back between frames
SHIFT+F10 - Display a shortcut menu for a link
SHIFT+TAB - Move back through the items on a page
CTRL+TAB - Move forward between frames
CTRL+C - Copy selected items to the clipboard
CTRL+V - Insert contents of the clipboard
ENTER - Activate a selected link
HOME - Move to the beginning of a document
END - Move to the end of a document
undefined: undefined »

20 thing you don't know about XP 0

Coder Himanshu | Friday, February 18, 2011 | ,

"You've read the reviews and digested the key feature enhancements and operational changes. Now it's time to delve a bit deeper and uncover some of Windows XP's secrets." 


1. It boasts how long it can stay up. Whereas previous versions of Windows were coy about how long they went between boots, XP is positively proud of its stamina. Go to the Command Prompt in the Accessories menu from the All Programs start button option, and then type 'systeminfo'. The computer will produce a lot of useful info, including the uptime. If you want to keep these, type 'systeminfo > info.txt'. This creates a file called info.txt you can look at later with Notepad. (Professional Edition only).


2. You can delete files immediately, without having them move to the Recycle Bin first. Go to the Start menu, select Run... and type 'gpedit.msc'; then select User Configuration, Administrative Templates, Windows Components, Windows Explorer and find the Do not move deleted files to the Recycle Bin setting. Set it. Poking around in gpedit will reveal a great many interface and system options, but take care -- some may stop your computer behaving as you wish. (Professional Edition only). 


3. You can lock your XP workstation with two clicks of the mouse. Create a new shortcut on your desktop using a right mouse click, and enter 'rundll32.exe user32.dll,LockWorkStation' in the location field. Give the shortcut a name you like. That's it -- just double click on it and your computer will be locked. And if that's not easy enough, Windows key + L will do the same. 


4. XP hides some system software you might want to remove, such as Windows Messenger, but you can tickle it and make it disgorge everything. Using Notepad or Edit, edit the text file /windows/inf/sysoc.inf, search for the word 'hide' and remove it. You can then go to the Add or Remove Programs in the Control Panel, select Add/Remove Windows Components and there will be your prey, exposed and vulnerable. 


5. For those skilled in the art of DOS batch files, XP has a number of interesting new commands. These include 'eventcreate' and 'eventtriggers' for creating and watching system events, 'typeperf' for monitoring performance of various subsystems, and 'schtasks' for handling scheduled tasks. As usual, typing the command name followed by /? will give a list of options -- they're all far too baroque to go into here. 


6. XP has IP version 6 support -- the next generation of IP. Unfortunately this is more than your ISP has, so you can only experiment with this on your LAN. Type 'ipv6 install' into Run... (it's OK, it won't ruin your existing network setup) and then 'ipv6 /?' at the command line to find out more. If you don't know what IPv6 is, don't worry and don't bother. 


7. You can at last get rid of tasks on the computer from the command line by using 'taskkill /pid' and the task number, or just 'tskill' and the process number. Find that out by typing 'tasklist', which will also tell you a lot about what's going on in your system. 


8. XP will treat Zip files like folders, which is nice if you've got a fast m
achine. On slower machines, you can make XP leave zip files well alone by typing 'regsvr32 /u zipfldr.dll' at the command line. If you change your mind later, you can put things back as they were by typing 'regsvr32 zipfldr.dll'. 


9. XP has ClearType -- Microsoft's anti-aliasing font display technology -- but doesn't have it enabled by default. It's well worth trying, especially if you were there for DOS and all those years of staring at a screen have given you the eyes of an astigmatic bat. To enable ClearType, right click on the desktop, select Properties, Appearance, Effects, select ClearType from the second drop-down menu and enable the selection. Expect best results on laptop displays. If you want to use ClearType on the Welcome login screen as well, set the registry entry HKEY_USERS/.DEFAULT/Control Panel/Desktop/FontSmoothingType to 2. 


10. You can use Remote Assistance to help a friend who's using network address translation (NAT) on a home network, but not automatically. Get your pal to email you a Remote Assistance invitation and edit the file. Under the RCTICKET attribute will be a NAT IP address, like 192.168.1.10. Replace this with your chum's real IP address -- they can find this out by going to www.whatismyip.com -- and get them to make sure that they've got port 3389 open on their firewall and forwarded to the errant computer.


11. You can run a program as a different user without logging out and back in again. Right click the icon, select Run As... and enter the user name and password you want to use. This only applies for that run. The trick is particularly useful if you need to have administrative permissions to install a program, which many require. Note that you can have some fun by running programs multiple times on the same system as different users, but this can have unforeseen effects. 


12. Windows XP can be very insistent about you checking for auto updates, registering a Passport, using Windows Messenger and so on. After a while, the nagging goes away, but if you feel you might slip the bonds of sanity before that point, run Regedit, go to HKEY_CURRENT_USER/Software/Microsoft/Windows/Current Version/Explorer/Advanced and create a DWORD value called EnableBalloonTips with a value of 0. 


13. You can start up without needing to enter a user name or password. Select Run... from the start menu and type 'control userpasswords2', which will open the user accounts application. On the Users tab, clear the box for Users Must Enter A User Name And Password To Use This Computer, and click on OK. An Automatically Log On dialog box will appear; enter the user name and password for the account you want to use. 


14. Internet Explorer 6 will automatically delete temporary files, but only if you tell it to. Start the browser, select Tools / Internet Options... and Advanced, go down to the Security area and check the box to Empty Temporary Internet Files folder when browser is closed. 


15. XP comes with a free Network Activity Light, just in case you can't see the LEDs twinkle on your network card. Right click on My Network Places on the desktop, then select Properties. Right click on the description for your LAN or dial-up connection, select Properties, then check the Show icon in notification area when connected box. You'll now see a tiny network icon on the right of your task bar that glimmers nicely during network traffic. 


16. The Start Menu can be leisurely when it decides to appear, but you can speed things along by changing the registry entry HKEY_CURRENT_USER/Control Panel/Desktop/MenuShowDelay from the default 400 to something a little snappier. Like 0. 


17. You can rename loads of files at once in Windows Explorer. Highlight a set of files in a window, then right click on one and rename it. All the other files will be renamed to that name, with individual numbers in brackets to distinguish them. Also, in a folder you can arrange icons in alphabetised groups by View, Arrange Icon By... Show In Groups. 


18. Windows Media Player will display the cover art for albums as it plays the tracks -- if it found the picture on the Internet when you copied the tracks from the CD. If it didn't, or if you have lots of pre-WMP music files, you can put your own copy of the cover art in the same directory as the tracks. Just call it folder.jpg and Windows Media Player will pick it up and display it. 


19. Windows key + Break brings up the System Properties dialogue box; Windows key + D brings up the desktop; Windows key + Tab moves through the taskbar buttons. 


undefined: undefined »

360Amigo System Speedup Pro Free License Serial Key 0

Coder Himanshu | Friday, February 18, 2011 | , ,

360Amigo System Speedup Pro is a new advanced and professional PC OPTIMIZATION
and error repair program which consists of a System Cleaner, System Optimizer and a wide variety of System Tools to dramatically enhance your PC performance, featuring an advanced Error Detection technology aimed for quickly fixing your PC problems. undefined: undefined »

360Amigo System Speedup Pro Free License Serial Key 0

Coder Himanshu | Thursday, February 17, 2011 | ,

360Amigo System Speedup Pro is a new advanced and professional pc optimization
and error repair program which consists of a System Cleaner, System Optimizer and a wide variety of System Tools to dramatically enhance your PC performance, featuring an advanced Error Detection technology aimed for quickly fixing your PC problems.

Key features of 360Amigo System Speedup Pro:
  • System Cleaner
    1. One-click solution
    2. System scan scheduler
    3. Free up disk space by cleaning junk data
    4. Clean up registry errors
    5. Delete hidden privacy exposing traces
    6. Erase private data permanently and safely
    7. Instantly fix the common problems
  • System Optimizer
    1. Automatically check disks at start up
    2. Complete list of internet connections running is provided
    3. Terminate unused and malicious computer processes
    4. Remove unneeded programs from start-up
    5. Defragmentation for files and folders is provided
  • Multi-functional disk tools
    1. Un-installs unneeded programs
    2. List of installed drivers is provided
    3. Check about the info of your entire computer system
    4. File recovery
    5. Manages or deletes system restore points
360Amigo System Speedup Pro normally costs $19.90 for purchase. As part of 360amigo promotion offer, the interested users are now entitled to download the full version of 360Amigo System Speedup Pro free of charge.

To grab a free copy of 360Amigo System Speedup Pro, visit 360Amigo’s giveaway promotion page and submit your details. Instantly, the license serial key and download URL for 360Amigo System Speedup Pro will be displayed.
360Amigo System Speedup Pro is fully compatible with Windows XP, Vista, Server 2003, Server 2008 and Windows 7 platform.
To download the programme visit here

undefined: undefined »

Hidden Start - Run Console Applications & Batch Files without any Window in the Background 0

Coder Himanshu | Wednesday, February 16, 2011 |

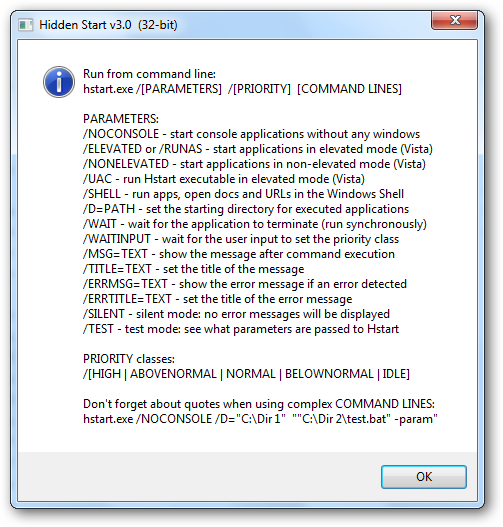
Console applications and batch files are regularly run at Windows startup and in schedule. The main inconvenience of this is that every application creates a new console window which flickers on the screen. Hidden Start (or Hstart) is a small startup manager that allows console applications to be started without any windows in the background and much more. Hstart is usually started by entering the following command line:
hstart /NOCONSOLE "batch_file_1.bat" "batch_file_2.bat" "batch_file_3.bat"
Hstart is very effective if you are using console utilities for everyday tasks: daily backups, automatic source code compilation and code signing. Please read the examples section below to see how it works out.
Hidden Start - Help Hstart is very small (~40 Kb), but it allows you to:
  • start multiple applications in the specified order synchronously;
  • start console applications without any windows in the background;
  • start non-elevated applications from elevated scripts and batch files (new in v3.0);
  • handle UAC privilege elevation under Windows Vista and above;
  • set the working directory and priority class of the created processes;
  • set the startup delay before command execution;
  • show success and error messages after command execution.
Using Hstart, it is also possible to run batch files in the background and save console output into a log file:
hstart /NOCONSOLE /IDLE /D="E:\Backups\"
       "cmd.exe /c "E:\Backups\backup.bat > backup-log.txt""
It is very effective if you are using console utilities for daily backups. The command line switch /IDLE means that the backup process will run with the lowest priority class, and /D="" sets the starting directory of the batch file (necessary if it uses relative paths).

What is new in the latest versions?

Hstart 3.0 contains a number of innovative features that make it easier to work with complex command lines and handle UAC privilege elevation on Windows Vista and above. Please read this carefully before using the newest version of Hstart.

User-friendly quote processing

Starting from version 2.0, Hstart uses its own algorithm to parse complex command line arguments. It enumerates all the opening/closing quotation marks and handles embedded quotes in a more user-friendly manner. Double-quoting is the way that you have to escape a single embedded quotation mark.
Important note for existing users
If you are moving from Hstart v1.x to the newest version, you have to recheck and possibly rewrite all your Hstart command lines. The following command line switches may help you to move quickly:
  • /TEST - enable the "test mode" to see what parameters are passed to Hstart and how they are processed;
  • /NQ - use the old algorithm to parse command line arguments, provided by CommandLineToArgvW function (for backward compatibility only, it is highly NOT recommended for new scripts).
Here is how it works out:
hstart /TEST "cmd.exe /k "echo "a phrase" "" with spaces "" eof""
Compare with the old algorithm:
hstart /NQ /TEST "cmd.exe /k \"echo \"a phrase\" \" with spaces \" eof\""
This will execute cmd.exe with the following parameters:
cmd.exe /k "echo "a phrase" " with spaces " eof"
And you will see: "a phrase" " with spaces " eof

Test mode

The /TEST command line switch allows you to see what parameters are passed to Hstart and how they are processed:
hstart /TEST "notepad "C:\Windows\System32\drivers\etc\hosts""
You will be prompted with an information message before executing any commands:
Hidden Start - Test Mode 
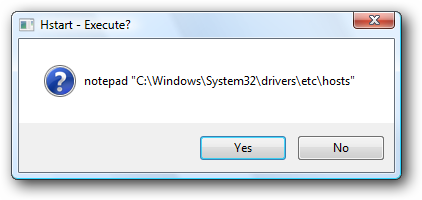
It is highly recommended to check all command lines with the /TEST switch before using Hstart in a real-world environment.

Message after command execution

Hstart allows you to run console applications completely hidden, and now there is a simple way to tell the user whether the command is executed correctly or not:
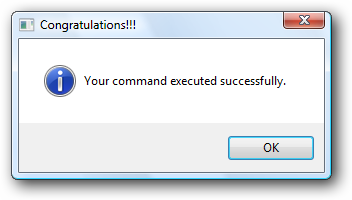
hstart /WAIT /MSG="Your command executed successfully."
       /TITLE="Congratulations!!!" "Success.exe -parameters"
This will bring up the following message after command execution:
Hidden Start - Success Message 
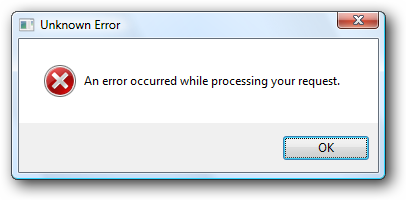
Here is how to set up an error message:
hstart /WAIT /ERRMSG="An error occurred while processing your request."
       /ERRTITLE="Unknown Error" "Failure.exe -parameters"
The error message will be displayed only if the executed command failed:
Hidden Start - Error Message Note that the /WAIT switch is required to determine the return code of the executed command. For a real-life example, please see Example 3: Code Signing with one click.

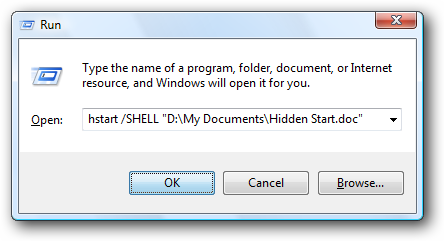
Run applications from the Windows Shell

Essentially, the new /SHELL command line switch works in the same way as the Windows Run dialog: the given parameters are passed to the Windows Shell to be handled rather than by calling the application directly. This makes it possible for the Shell to select an appropriate program to run for a given filename.
Hidden Start - Run Dialog The /SHELL command line switch is also required when running elevated and UIAccess applications under Windows Vista and 7.

UAC privilege elevation under Windows Vista

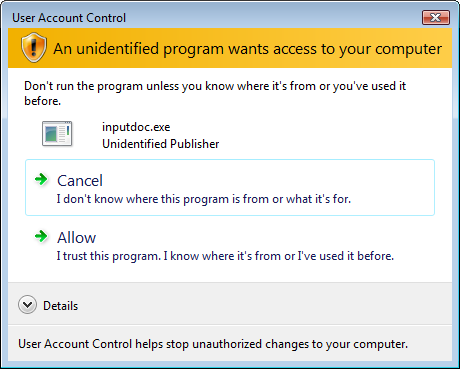
Especially for Windows Vista users, Hstart 3.0 provides two new command line switches: /RUNAS and /UAC. The first switch is equal to the "Run as administrator" Shell command:
hstart /RUNAS "notepad.exe" "cmd.exe" "inputdoc.exe"
After running this command line, you will see three UAC confirmation dialogs: first for Notepad, second for Command Prompt and third for an unsigned application (inputdoc.exe). Here is the third UAC dialog:
Unidentified Application - UAC Confirmation Dialog Compare with the following command line:
hstart /UAC "notepad.exe" "cmd.exe" "inputdoc.exe"
In this case, you will see only one UAC confirmation dialog asking you to run Hstart executable with administrative privileges:
Hidden Start - UAC Confirmation Dialog 
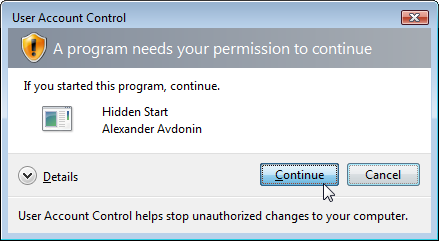
Hstart executable is digitally signed, so it can be used to launch other unsigned applications at Windows startup without being blocked by UAC.
It is also possible to run a batch file with full administrative privileges (for example, to be able to write to %ProgramFiles% or system directories) in hidden mode:
hstart /RUNAS /NOCONSOLE "D:\Batch Files\Requires_Admin_Privileges.bat"
The /NOCONSOLE and /NOWINDOW command line switches work also for PowerShell and Ruby scripts as well as for CMD windows.

Start non-elevated applications from elevated (new in v3.0)

On Windows Vista, programs started from an elevated application or script would also run in elevated mode with full administrative rights. Hstart 3.0 gives an easy and native way to start a non-elevated program from the command line or a batch file, even if the command line process is elevated.
hstart /NONELEVATED "D:\Batch Files\Non_Elevated_Script.bat"
Installers that always run with full administrative rights on Vista computers can benefit from using Hstart with the /NONELEVATED switch and run other programs or scripts with the rights of the currently logged on user.
Note that /WAIT and /[PRIORITY] flags are ignored if you specify the /NONELEVATED command line switch. Though you can still use the /NOCONSOLE switch to run application in hidden mode and pass multiple command lines to Hstart.

Examples of Usage

Here are a few real-world examples of using Hstart:

Hidden Start 3.2 (32-bit and 64-bit),


powered by ntwind.com
undefined: undefined »

Make Undeletable or Unreadable Folders 0

Coder Himanshu | Tuesday, February 15, 2011 | , ,

Hello friends,

Steps to “Make a Undeletable or Unreadable Folder”


By holding down alt, then typing numbers on the number pad (right of the keyboard) you can create special characters. If you hold down alt, then press 1, then let go, you got the ascii character 1. You try some randomn numbers. This goes all the way up to 255. Open a dos prompt, and type md (alt+1+9+4)someword. md is the dos command to make a directoy, now try and open the directory in Windows, you can’t. To open it, type ren (alt+1+9+4)someword someword (ren is the dos command to rename).
Comment if you like it:. undefined: undefined »

How To Set a Video as Desktop Background 0

Coder Himanshu | Tuesday, February 15, 2011 | , ,

Do you want to set a Video as your desktop background instead of wallpaper ?
Its very simple to impress your buddies by doing so... If you want set a video background, just follow this simple steps:-

1. First of all you need a VLC player installed in your OS to perform this task. If not than download the VLC player from internet and install it.

2. Run VLC media player,go to Settings->preferences->Interface->Main interfaces,then click on wxWidgets.Remove the tick on "Taskbar" and put a tick on "Systray icon".

3. Now go to Video ->Output Modules->DirectX.On the bottom right put a tick on advanced options check box.You will now see some options.Put a tick on "Enable Wallpaper Mode ".

4. Now,select playlist and put a check or tick on "Repeat current item ".

5. Press the Save button.Now close the Vlc player and run it again(to save the settings permanently).

6. Now play any video you would like to set as Wallpaper.Right click on the video and click on "Wallpaper".The video would be set as your wallpaper undefined: undefined »

How to Make Your PDF Files Speak to You. 0

Coder Himanshu | Tuesday, February 15, 2011 | ,

This is an Interesting Trick i found in Adobe Reader. This works in Adobe Reader 7.0 through the latest 10.0
1. First of all open Adobe Reader
2. Ok So first you go to View>Read out Loud> Activate Read Out Loud.

3. After you have done that just do this.


Now it will read it to you out loud in the Default Microsoft Sam voice. undefined: undefined »

Ashampoo Magic Uninstaller 2 0

Coder Himanshu | Tuesday, February 15, 2011 | ,

Ashampoo Magical UnInstall completely monitors each new installation. This is ensured by the system remembering each single change to the system. But thats not all to it: Installations can be completely undone, if requested. This means: If you leave uninstallation of software to Ashampoo Magical UnInstall, the system will look afterwards the same as before installation, i.e. no single unused file will remain on the system. Automatically recognizes a retrieved SETUP.EXE or INSTALL.EXE programme and records the following installation. The tool may be configurated in such a way as to recognize also installation programmes with any other names. Any uninstallation can be undone at any time using the ReInstaller tool. Automatic checking for available updates online. Installation screen starts with installation and records any changes to the system. Any newly-installed add-ons, plug-ins or patches can be added to installation recordings at a later stage


To visit home page click here


To get the free product key of ashampoo magic uninstaller 2 click here


To Download ashampoo magic uninstaller 2 from cnet.com undefined: undefined »

How to bootup computer 10 seconds lesser- For Windows Xp 1

Coder Himanshu | Monday, February 14, 2011 | , , ,

Do you have to wait a minute to get your bloddy computer get shutdown ....then I have a solution which will surely make your computer shutoff faster than ever which will be told detailed in this post


Follow this easy instruction given below for a faster shutdown :---------


1) Press Windows Key and "R" to launch the run command.

2) Type "regedit" inside the input space.

3) Navigate to the registry key

HKEY_LOACAL_MECHINE\SYSTEM\CurrentControlSet\Control\ContentIndex


image

4) Select Decimal, and change the value to 40000

image


PLZ GIVE FEEDBACK WHATHER IT WORK OR NOT undefined: undefined »

Get CopyTrans TuneSwift Activation Code for Free 1

Coder Himanshu | Sunday, February 13, 2011 | ,

CopyTrans.net offer again CopyTrans TuneSwift Activation Code for Free until March 15, 2011. CopyTrans TuneSwift provides complete software to manage or move your iTunes library from one PC to another without iTunes software.
CopyTrans TuneSwift is the easiest and safest way to move iTunes data (including iPod Touch, iPad and iPhone) to a Mac or PC without losing your iTunes library. Backup and save the latest changes of your iTunes library and Import the iTunes library from an external hard drive and restore it from previous backups anytime and anywhere.

CopyTrans TuneSwift Main Windows
CopyTrans TuneSwift Features
  • Transfer iTunes library. This software compatible with Mac OS, windows XP, Vista and Windows 7. Support for windows 32bit and 64 bit
  • Back up the entire iTunes library.  CopyTrans TuneSwift can backup iTunes library in your iPod, iPhone and iPad including music, videos, applications, books, purchases, artworks, playlists, and many more in a single archive.
  • Restore iTunes library from any backup anytime and anywhere
  • Save the latest changes of the iTunes library
  • Move iTunes library from Windows to Mac and transfer iTunes library to an external hard drive or a new folder
How to get CopyTrans TuneSwift Activation Code
Open CopyTrans TuneSwift promo page here: http://www.copytrans.net. Download the software and install in your PC and copy the activation code to activate the software.


CopyTrans TuneSwift activation code undefined: undefined »

Daily Game Feb 11 - Collapse It 0

Daily Game | Friday, February 11, 2011 |

Place the bombs in the correct places in order to take out the people in each level.

Collapse It is powered by dailygame.org undefined: undefined »

Daily Game Feb 10 - Bubble Tanks 3 0

Daily Game | Thursday, February 10, 2011 |

Gather more bubbles from your destroyed enemies to upgrade and modify your tank.

Bubble Tanks 3 is powered by dailygame.org undefined: undefined »

Daily Game Feb 09 - Icy Gifts 0

Daily Game | Wednesday, February 09, 2011 |

A fun chain reaction game that features power ups and upgrades.

Icy Gifts is powered by dailygame.org undefined: undefined »

Bad Application ;) 0

Coder Himanshu | Tuesday, February 08, 2011 | ,

This tool does nothing! It only emulates a bad application. BadApp allows you to change its process priority, start an endless loop (i.e. "hang" or stop responding) and crash its process. In addition, it can flash window and terminate the shell process - Windows Explorer.
Bad Application - Screenshot 
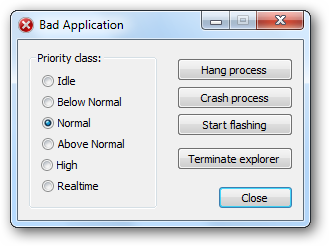
BadApp is mainly used for testing purposes. I always test with it my system utilities which interact with other applications.


Full source code is included with the compiled version!


undefined: undefined »

Nokia phone secret codes 0

Coder Himanshu | Tuesday, February 08, 2011 | ,

These codes will work on most Nokia Mobile Phones to activate/deactivate advanced hidden functions that you can’t change through the phone menu

On the main screen type in:
*#06# for checking the IMEI (International Mobile Equipment Identity).
*#7780# reset to factory settings. 

*#67705646# This will clear the LCD display(operator logo).
*#0000# To view software version.
*#2820# Bluetooth device address.
*#746025625# Sim clock allowed status.
#pw+1234567890+1# Shows if sim have restrictions.
*#92702689# - takes you to a secret menu where you may find 
 Some of the information below:


1. Displays Serial Number.
2. Displays the Month and Year of Manufacture
3. Displays (if there) the date where the phone was purchased (MMYY)
4. Displays the date of the last repair - if found (0000)
5. Shows life timer of phone (time passes since last start) 


*#3370# - Enhanced Full Rate Codec (EFR) activation. Increase signal strength, better signal reception. It also help if u want to use GPRS and the service is not responding or too slow. Phone battery will drain faster though.
*#3370* - (EFR) deactivation. Phone will automatically restart. Increase battery life by 30% because phone receives less signal from network.
*#4720# - Half Rate Codec activation.
*#4720* - Half Rate Codec deactivation. The phone will automatically restart
If you forgot wallet code for Nokia S60 phone, use this code reset: *#7370925538#
Note, your data in the wallet will be erased. Phone will ask you the lock code. Default lock code is: 12345
Press *#3925538# to delete the contents and code of wallet.
Unlock service provider: Insert sim, turn phone on and press vol up(arrow keys) for 3 seconds, should say pin code. Press C,then press * message should flash, press * again and 04*pin*pin*pin# \
*#7328748263373738# resets security code.

Default security code is 12345
Change closed caller group (settings >security settings>user groups) to 00000 and ure phone will sound the message tone when you are near a radar speed trap. Setting it to 500 will cause your phone 2 set off security alarms at shop exits, gr8 for practical jokes! (works with some of the Nokia phones.) Press and hold "0" on the main screen to open wap browser.
Code Function
*3370# Activate Enhanced Full Rate Codec (EFR) - Your phone uses the best sound quality but talk time is reduced my approx. 5%
#3370# Deactivate Enhanced Full Rate Codec (EFR)
*#4720# Activate Half Rate Codec - Your phone uses a lower quality sound but you should gain approx 30% more Talk Time
*#4720# Deactivate Half Rate Codec

#pw+1234567890+1# Provider Lock Status. (use the “*” button to obtain the “p,w” and “+” symbols)
#pw+1234567890+2# Network Lock Status. (use the “*” button to obtain the “p,w” and “+” symbols)
#pw+1234567890+3# Country Lock Status. (use the “*” button to obtain the “p,w” and “+” symbols)
#pw+1234567890+4# SIM Card Lock Status. (use the “*” button to obtain the “p,w” and “+” symbols)
12345 This is the default security code

*#21# Allows you to check the number that “All Calls” are diverted to
*#30# Lets you see the private number
*#43# Allows you to check the “Call Waiting” status of your phone.
*#61# Allows you to check the number that “On No Reply” calls are diverted to
*#62# Allows you to check the number that “Divert If Unreachable (no service)” calls are diverted to
*#67# Allows you to check the number that “On Busy Calls” are diverted to

*#0000# Displays your phones software version, 1st Line : Software Version, 2nd Line : Software Release Date, 3rd Line : Compression Type
*#9999# Phones software version if *#0000# does not work
*#06# For checking the International Mobile Equipment Identity (IMEI Number)

*#67705646# Removes operator logo on 3310 & 3330
*#73# Reset phone timers and game scores
*#746025625# Displays the SIM Clock status, if your phone supports this power saving feature “SIM Clock Stop Allowed", it means you will get the best standby time possible
*#94870345123456789# Deactivate the PWM-Mem
press and hold # Lets you switch between lines

*#7760# Manufacturers code
*#7780# Restore factory settings
*#8110# Software version for the nokia 8110
*#92702689# Displays - 1.Serial Number, 2.Date Made, 3.Purchase Date, 4.Date of last repair (0000 for no repairs), 5.Transfer User Data. To exit this mode you need to switch your phone off then on again

**21*number# Turn on “All Calls” diverting to the phone number entered
**61*number# Turn on “No Reply” diverting to the phone number entered
**67*number# Turn on “On Busy” diverting to the phone number entered


Nokia Secret Codes
The complete guide

Here's a list of known codes on Nokia mobile phones. This list does not include codes that make request to the network. To use these codes, just dial them like normal numbers.
Code    Description
*#06#    Display the IMEI (GSM standard)

*#0000#    Display the firmware version and date (with variant info on S40 second edition or newer)
*#9990#    Says "Bluetooth Test Mode" on Symbian models; accepts without any messages and Bluetooth behaves abnormally on non-Symbian ones (models with build-in Bluetooth radio, activate first to use)
*#bta0#    Display the Bluetooth MAC address (models with build-in Bluetooth radio, activate first to show address)
*#mac0wlan#    Display the WLAN MAC address (models with build-in Wi-fi radio)
*#opr0logo#    Clear the operator logo (3310 and 3330 only)
*#pca0#    Activate the GPRS PCCCH support (early GPRS models)
*#pcd0#    Deactivate the GPRS PCCCH support (early GPRS models)
*#res0wallet#    Reset the mobile wallet (models with mobile wallet)
*#res0#    Soft-format the memory (Symbian models only)
*#rst0#    Reset to factory defaults, confirmation required (DCT4 or newer)
*#sim0clock#    Display the SIM clock status (DCT3 only)
*#ssn0#    Display the manufacturing serial number (mid-range and premium DCT3, basically all DCT4 and BB5 non-Symbian models)
*#war0anty#    Display the manufacturing and repair info (no exit on DCT3) or total talk time on
Symbian models
*efr0#    Enable EFR encoding (pre-2003 models)
#efr0#    Disable EFR encoding (pre-2003 models)
*hra0#    Enable HR encoding (pre-2003 models)
#hra0#    Disable HR encoding (pre-2003 models)
#pw+1234567890+n#    Display the SIM lock status: (pre-2003 models)
n = 1: provider lock
n = 2: network lock
n = 3: country lock
n = 4: SIM lock
n#    n = 1..999: recall the number stored in the SIM location n (DCT3, DCT4, BB5 models)

These codes will work on most Nokia Mobile Phones to activate/deactivate advanced hidden functions that you can’t change through the phone menu
One useful function that all Nokia’s I’ve owned have is “Cell Info Display” which can usually be found in the phones “Display settings” (eg: in a Nokia 1600) or “Phone Settings” (eg: in a Nokia 3315)
If your network supports it, when “Cell Info Display” is enabled, it will display the name of the base station your mobile is currently connected to on the screen. eg: when i’m walking around the city it says “Sydney CBD” and when i’m at home it displays the name of my suburb.
Note:
To display “p” press “*” three times within one second, To display “w” press “*” four times within one second, To display “+” press twice “*” within less than a second
Code Function
*3370# / #3370# Activate / Deactivate Enhanced Full Rate Codec (EFR) - Your phone uses the best sound quality but talk time is reduced my approx. 5%
*#4720# / *#4720# Activate / Deactivate Half Rate Codec - Your phone uses a lower quality sound but you should gain approx 30% more Talk Time
*#7220# / *#7230# Enable / Disable PCCCPH support (faster GPRS)
#pw+1234567890+1# Provider Lock Status. (use the “*” button to obtain the “p,w” and “+” symbols)
#pw+1234567890+2# Network Lock Status. (use the “*” button to obtain the “p,w” and “+” symbols)
#pw+1234567890+3# Country Lock Status. (use the “*” button to obtain the “p,w” and “+” symbols)
#pw+1234567890+4# SIM Card Lock Status. (use the “*” button to obtain the “p,w” and “+” symbols)
12345 This is the default security code
*#0000# Displays your phones software version, 1st Line : Software Version, 2nd Line : Software Release Date, 3rd Line : Compression Type
*#9999# Phones software version if *#0000# does not work
*#06# For checking the International Mobile Equipment Identity (IMEI Number)
*#67705646# Removes operator logo on 3310 & 3330
*#73# Reset phone timers and game scores
*#746025625# Displays the SIM Clock status, if your phone supports this power saving feature “SIM Clock Stop Allowed”, it means you will get the best standby time possible
press and hold # Lets you switch between lines

*#7760# Manufacturers code
*#7780# Restore factory settings
*#8110# Software version for the nokia 8110
*#92702689# Displays - 1.Serial Number, 2.Date Made, 3.Purchase Date, 4.Date of last repair (0000 for no repairs), 5.Transfer User Data. To exit this mode you need to switch your phone off then on again undefined: undefined »

Lock a Folder in Windows XP-without any software 0

Coder Himanshu | Tuesday, February 08, 2011 | , ,


 How many times have you wished of a software using which you can hide or lock files,  restricting its access to other unwanted users. Although there are various software available in market using which you can easily lock/hide files but,I personally dont trust them because most of them are bloatware or spyware.Today
In this post I am going to share a simple yet powerful way of locking and hiding important files using a the following method. Follow the instructions to make you own Locker ( Without any software !! ) :
  • Open notepad.
  • Copy the following code in notepad file :
    cls @ECHO OFF title Folder Locker-created by himanshu if EXIST "Control Panel.{21EC2020-3AEA-1069-A2DD-08002B30309D}" goto UNLOCK if NOT EXIST Locker goto MDLOCKER :CONFIRM echo Are you sure u want to Lock the folder(Y/N) set/p "cho=>" if %cho%==Y goto LOCK if %cho%==y goto LOCK if %cho%==n goto END if %cho%==N goto END echo Invalid choice. goto CONFIRM :LOCK ren Locker "Control Panel.{21EC2020-3AEA-1069-A2DD-08002B30309D}" attrib +h +s "Control Panel.{21EC2020-3AEA-1069-A2DD-08002B30309D}" echo Folder locked goto End :UNLOCK echo Enter password to Unlock folder set/p "pass=>" if NOT %pass%==YOUR PASSWORD HERE goto FAIL attrib -h -s "Control Panel.{21EC2020-3AEA-1069-A2DD-08002B30309D}" ren "Control Panel.{21EC2020-3AEA-1069-A2DD-08002B30309D}" Locker echo Folder Unlocked successfully goto End :FAIL echo Invalid password goto end :MDLOCKER md Locker echo Locker created successfully goto End :End
  • Change the “YOUR PASSWORD HERE” with your password.
  • Save it as batch file ( with extension .bat ) For eg. Locker.bat
  • Now you will see a batch file. Double click it to create a folder locker ( A new folder named Locker would be formed at the same location )
  • Thats it you have now created your own locker and that too without using any software !
  • Brings all the files you want to hide in the locker folder.
  • Double click the batch ( As created above ) file to lock the folder namely Locker.
If you want to unlock your files, simple double click the batch file again and you would be prompted for password ( In DOS window ). Enter the password and enjoy access to the folder. undefined: undefined »

Set Processes Priority 0

Coder Himanshu | Monday, February 07, 2011 | , ,

Follow this tip to increase the priority of active processes, this will result in prioritisation of processes using the CPU.

CTRL-SHIFT-ESC


1.Go to the second tab called Processes, right click on one of the active processes, you will see the Set Priority option

2.For example, your Run your CDwriter program , set the priority higher, and guess what, no crashed CD’s
undefined: undefined »

How To Remove “Error Deleting File or Folder” 0

Coder Himanshu | Monday, February 07, 2011 | , ,

It is a very common and annoying message that the file or folder you are trying to deleted cannot be deleted or thependrive cannot be removed as it is used by the system.In this tutorial I will show how to remove your pendrive or delete the files and folders if you get such an error.This error has various flavours and it can be of any of the following types:
  • Cannot delete file: Access is denied
  • There has been a sharing violation.
  • The source or destination file may be in use.
  • The file is in use by another program or user.
  • Make sure the disk is not full or write-protected and that the file is not currently in use. 


Here is the step by step tutorial with screenshots on How To Remove “Error Deleting File or Folder”in Unlocker


1.Download and Install Unlocker.Click Here To Download(837 kb)
2.Right click on the or file or folder that has to be removed or deleted.


3.Now,Click on the Unlocker
4.Now it will show all the processes that are using the file or folder or Pendrive.
5.Click on the Unlock All and you are done.Now you can delete the file or folder or remove the pendrive.


Another interesting tool is the iobit unlocker which is also a freeware tool Click here to download 

Here is the step by step tutorial with screenshots on How To Remove “Error Deleting File or Folder”in Iobit Unlocker

1: Right click on the file or folder that has to be removed


2:After that click unlock [as shown in the picture below]


And...lo your file has been unlocked

undefined: undefined »

Trick To Play hidden Snake Game In Youtube 0

Coder Himanshu | Monday, February 07, 2011 | ,

We all visit youtube and watch videos but how many of us are aware of youtube hidden Snake game.I believe only a few people know about this hidden snake game.You can play this game on youtube while streaming any video.Snake gmae is one of the most interesting and traditional game in the world of gaming.In this tutorial I will show you how you can play this game on youtube.


Lets begin the tutorial on how to play hidden game on youtube

1.Goto youtube and open any video for streaming

2.When the video is streaming Hold left button of mouse + Left arrow on keyboard + Top arrow on keyboard.

3.Now you will see that the streaming circle starting to move like a snake. undefined: undefined »

Play Online Pacman Game At Google 0

Coder Himanshu | Monday, February 07, 2011 | , , ,

If you are getting bored and need something intersting to kill your time then go for this online game. To celebrate 30 years of pacman google created its first ever playable doodle the pacman doodle.It was put on the google homepage for 2 complete days on google home to mark its 30thanniversary.But due to large success of the pacman game google created a special page where you can play pacman and kill some time.


Click on the “ Insert Coin “ Button and now you will two pacman.One pacman can be controlled with the arrow keys and the second pacman will be controlled with “ A,S,D,W “ keys.


Click here to play Pacman Game (multiplayer) Online undefined: undefined »

Google Hacker- Another Google hack 0

Coder Himanshu | Monday, February 07, 2011 | , , ,

Want to see how the google homepage will look if it gets hacked .Follow the instructions below
  • Go to google.com
  • Type Google Hacker
  • Click on I’m feeling Lucky
Or skip this step and type http://www.google.com/webhp?hl=xx-hacker undefined: undefined »

Annoying Google - Google hacks 0

Coder Himanshu | Monday, February 07, 2011 |

In this trick the capitalisation of your searches will change automatically.Some words will change into small letter and some into capital letters in your search result.Want to try it follow the instructions
  • Go to google.com
  • Type Annoying Google
  • Click on I’m feeling Lucky
Or skip this and just type  http://www.donttypelikethis.com undefined: undefined »

WindowSpace - Most Organized Workspace 0

Coder Himanshu | Monday, February 07, 2011 |

WindowSpace is a powerful desktop enhancement utility for large monitors, widescreens and multi-monitor systems. Once installed, it allows you to manipulate windows in many new amazing ways – snap windows to the screen edges and other windows, move and resize them with keyboard shortcuts, maximize vertically or horizontally, pin on top of the other windows, hide from view, minimize to tray, and it’s just the beginning!


Get your license key for WindowSpace, instant key delivery (+ free upgrades)
Purchase WindowSpace
The latest version 2.5.2 was released on October 26, 2010 (change log)

Be sure that you are using the original software: Verify digital signatures!
Most of the actions can be triggered with the hotkeys, some by selecting the corresponding options from the window menu. New window actions give extra comfort to the owners of large monitors, widescreens, multi-monitor systems, and the users who have to multitask in many applications but have a limited desktop space. undefined: undefined »

Visual Subst - Virtual Drives In Effect 0

Coder Himanshu | Monday, February 07, 2011 | ,

Visual Subst is a small tool that allows you to associate the most accessed directories with virtual drives. It uses the same API similar to the console 'subst' utility, but makes it easier to create and remove virtual drives in a GUI way.
Visual Subst 
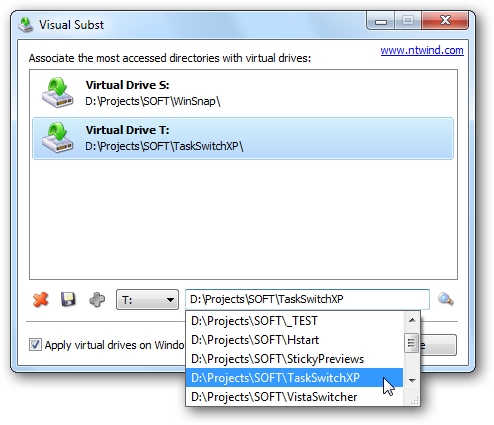
Personally, I use virtual drives everywhere – I always prefer to press ALT+F1 in the file manager and switch to a project directory where hundreds of various files are kept. Using virtual drives, these files can be quickly accessed at any time.

For Programmers

If you have the Platform SDK installed and need to use it frequently, it is possible to create a virtual drive mounted on the Samples directory. You can therefore reduce a long path like 'C:\Program Files\Microsoft Platform SDK\Samples\Multimedia\DirectShow' to just one letter.
In my opinion, this is the shortest way to gain access to the sample source code from the SDK when it is required on a continual basis.

How It Works

Generally, a virtual drive is just a symbolic link in the Local MS-DOS Device namespace. It is just one more Windows feature added for backward compatibility with old programs.
Virtual drives are therefore objects of the operating system, and Visual Subst can create, enumerate and delete these objects. All local MS-DOS device names are removed when the user is logging off. To handle this issue, Visual Subst saves the list of virtual drives into an INI-file and is able to load them the next time.
This program runs only on Windows 2000/XP and newer operating systems.

Download

Visual Subst does not require installation. It is fully portable because all settings are stored into an INI-file. However there is a simple installer provided which will help you to create some program shortcuts.
Please choose a package you would like to download:


powered by  ntwind.com undefined: undefined »

Daily Game Feb 07 - Born into darkness 0

Daily Game | Monday, February 07, 2011 |

Shoot the shadows and survive as long as you can.

Born into darkness is powered by dailygame.org undefined: undefined »

Mouse middle button shortcuts for Browser 0

Coder Himanshu | Monday, February 07, 2011 | , ,

We often use mouse to quickly navigate to elements on a webpage. While there are Chrome keyboard shortcuts to perform basic tasks quickly in browser, you can also use mouse’s middle button (mouse wheel) for even quicker actions in Chrome. Checkout following listing of mouse middle button shortcuts for browser.

1. Open Links in Browser

Click link with middle mouse button / mousewheel to open link in new tab in the background.
Click link with middle mouse button / mousewheel and press Shift key to open link in a new tab and switch to the newly opened tab.

2. Open buttons in Chrome menu bar ( for Google chrome)

You can click menu buttons like forward, back, refresh with middle mouse button / mousewheel to open them in new tab in the background.

3. Close Tabs in Browser

Click middle mouse button or press mousewheel to close any opened tab.

4. Zoom In / Out webpage

Press Ctrl and scroll your mousewheel up will enlarge or zoom in webpage.
Press Ctrl and scroll your mousewheel down will zoom out and make webpage smaller.

5. Scrolling webpage layout

Press middle mouse button or mousewheel to activate auto scrolling. Move your mouse around auto scroll icon to navigate webpage in desired direction. undefined: undefined »

Tricks to reduce PDF file size 0

Coder Himanshu | Sunday, February 06, 2011 |

The two biggest things to look at when you want to reduce the size of PDF files are removing objects and downsampling/shrinking the images it contains.


A handy trick for reducing PDF file size is to re-create or ‘re-fry’ your PDF. By creating the PDF again you can strip out plenty of unwanted objects, remove tags, and compress images further. You can do this with any tool that supports ‘print to PDF’ functionality. For this trick I’ll use the free free PrimoPDF print driver.
Open the PDF file
Open the Print dialog
Select PrimoPDF from the list of printers
On the PrimoPDF dialog, click eBooks. (Or to manually control the level of downsampling, choose Custom.)
Click OK.
Shrink all images in PDF files
For PDF files that contain many images, downsampling all of them can make a noticeable difference.
Open the PDF in your PDF editor
In Nitro PDF Professional, go to Nitro PDF Button > Prepare > Optimize Document. In Acrobat 8, go to Advanced > PDF Optimizer.
In Nitro PDF Professional, use the slider to select the level of downsampling. In Acrobat 8, in the Images tab, specify the level of downsampling. undefined: undefined »

Windows explorer shortcuts 0

Coder Himanshu | Saturday, February 05, 2011 | ,

ALT+SPACEBAR - Display the current window’s system menu
SHIFT+F10 - Display the item's context menu
CTRL+ESC - Display the Start menu
ALT+TAB - Switch to the window you last used
ALT+F4 - Close the current window or quit
CTRL+A - Select all items
CTRL+X - Cut selected item(s)
CTRL+C - Copy selected item(s)
CTRL+V - Paste item(s)
CTRL+Z - Undo last action
CTRL+(+) - Automatically resize the columns in the right hand pane
TAB - Move forward through options
ALT+RIGHT ARROW - Move forward to a previous view
ALT+LEFT ARROW - Move backward to a previous view
SHIFT+DELETE - Delete an item immediately
BACKSPACE - View the folder one level up
ALT+ENTER - View an item’s properties
F10 - Activate the menu bar in programs
F6 - Switch between left and right panes
F5 - Refresh window contents
F3 - Display Find application
F2 - Rename selected item
undefined: undefined »

Windows shortcut keys 0

Coder Himanshu | Saturday, February 05, 2011 | ,


Some of Windows users tend to use Keyboard Shortcut Keys for performing a task or an operation. They prefer using it because it is faster than using Mouse. I am one of the user who use lot of Windows Shortcut Keys.

ALT+- (ALT+hyphen) Displays the Multiple Document Interface (MDI) child window's System 
menu
ALT+ENTER View properties for the selected item
ALT+ESC Cycle through items in the order they were opened
ALT+F4 Close the active item, or quit the active program
ALT+SPACEBAR Display the System menu for the active window
ALT+TAB Switch between open items
ALT+Underlined letter Display the corresponding menu
BACKSPACE View the folder one level up in My Computer or Windows Explorer
CTRL+A Select all
CTRL+B Bold
CTRL+C Copy
CTRL+I Italics
CTRL+O Open an item
CTRL+U Underline
CTRL+V Paste
CTRL+X Cut
CTRL+Z Undo
CTRL+F4 Close the active document
CTRL while dragging Copy selected item
CTRL+SHIFT while dragging Create shortcut to selected iteM
CTRL+RIGHT ARROW Move the insertion point to the beginning of the next word
CTRL+LEFT ARROW Move the insertion point to the beginning of the previous word
CTRL+DOWN ARROW Move the insertion point to the beginning of the next paragraph
CTRL+UP ARROW Move the insertion point to the beginning of the previous paragraph
SHIFT+DELETE Delete selected item permanently without placing the item in the Recycle Bin
ESC Cancel the current task
F1 Displays Help
F2 Rename selected item
F3 Search for a file or folder
F4 Display the Address bar list in My Computer or Windows Explorer
F5 Refresh the active window
F6 Cycle through screen elements in a window or on the desktop
F10 Activate the menu bar in the active program
SHIFT+F10 Display the shortcut menu for the selected item
CTRL+ESC Display the Start menu
SHIFT+CTRL+ESC Launches Task Manager
SHIFT when you insert a CD Prevent the CD from automatically playing
WIN Display or hide the Start menu
WIN+BREAK Display the System Properties dialog box
WIN+D Minimizes all Windows and shows the Desktop
WIN+E Open Windows Explorer
WIN+F Search for a file or folder
WIN+F+CTRL Search for computers
WIN+L Locks the desktop
WIN+M Minimize or restore all windows
WIN+R Open the Run dialog box
WIN+TAB Switch between open items
undefined: undefined »

Shake your Browser 0

Coder Himanshu | Friday, February 04, 2011 | , ,

image
This is a funny trick that can create a shaking screen on your web browser (i.e. Internet Explorer, etc..)
The trick is simply a small Java Script that causes your browser window to move to different positions, causing a shake of your entire screen. It's kind of cool to watch and see what Java Script can do!
Use this trick at your own risk.
Here's how:
first open some page in Your Browser

Copy this entire shown below and paste it onto your address box, then press Enter:


javascript:function Shw(n) {if (self.moveBy) {for (i = 35; i > 0; i--) {for (j = n; j > 0; j--) {self.moveBy(1,i);self.moveBy(i,0);self.moveBy(0,-i);self.moveBy(-i,0); } } }} Shw(6)


Please  pass a comment if you like this
 
undefined: undefined »